
GP Logo & Menu for GP Premium + Generatepress
Set different menu & logo link for your generatepress theme! Zero frontend JS, fully native WP Settings.
GP Logo & Menu plugin adds a Header Rules metabox inside the GP Element editor with controls.
GP Logo & Menu — Feature List
Features
- Custom Logo Link — Set a custom URL for your site logo, overriding the default homepage link
- Open in New Tab — Optionally open the logo link in a new browser tab with proper
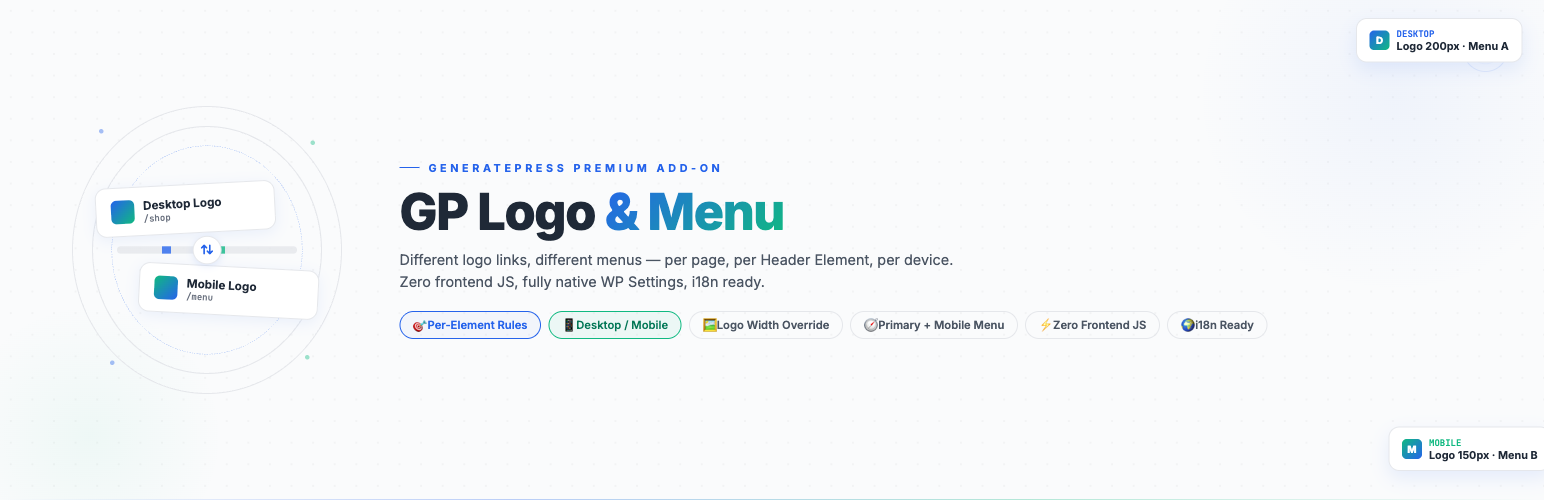
rel="noopener noreferrer"attributes - Logo Width (Desktop) — Override the logo image width on desktop screens with a custom pixel value
- Logo Width (Mobile) — Set a separate logo width for mobile devices (screens ≤ 768px)
- Primary Menu Override — Assign a different WordPress menu to the primary navigation location
- Mobile Menu Override — Assign a separate menu for mobile visitors, automatically served based on device detection
- Per-Element Settings — All settings are configured per Header Element, allowing different logos and menus across different pages
- Dependency Notice — Admin notice when GP Premium is not detected, with one-click dismiss
- i18n Ready — Full translation support with English and Chinese (Simplified) language packs included
Usage Instructions
Requirements
- WordPress 5.8 or higher
- PHP 7.4 or higher
- GeneratePress Premium plugin with the Header Elements module enabled
Installation
- Upload
gp-logo-menu.zipto/wp-content/plugins/ - Activate the plugin through the Plugins screen in WordPress
- Navigate to Elements under GeneratePress Premium
- Edit a Header Element to find the Logo & Menu metabox
Configuration
- Edit a Header Element — Go to Elements → Add New (or edit an existing one). The element type must be set to Header.
- Find the “Logo & Menu” metabox — Located below the element editor on the post edit screen.
- Logo Link URL — Enter a custom URL (e.g.
https://example.com). Leave empty to use the theme default. - Open in New Tab — Check this box to make the logo link open in a new browser tab.
- Logo Width (Desktop) — Enter a pixel value (e.g.
200) to set the logo width on desktop. Leave empty to use the default. - Logo Width (Mobile) — Enter a pixel value (e.g.
150) to set the logo width on screens ≤ 768px wide. - Primary Menu — Select a menu from the dropdown to replace the primary navigation. Choose Inherit from Theme to use the default.
- Mobile Menu — Select a separate menu for mobile visitors. If not set, the Primary Menu (or theme default) will be used on all devices.
- Save — Click Update or Publish to save your settings.
Display Conditions
The Logo & Menu settings only apply to pages where the Header Element is active. Use GeneratePress Premium’s built-in Display Rules to control which pages the element appears on.
Frequently Asked Questions
Q: Does this plugin work with the free GeneratePress theme? A: No. This plugin requires GeneratePress Premium with the Header Elements module enabled.
Q: Can I set different logos and menus for different pages? A: Yes. Create multiple Header Elements with different Display Rules, and configure the Logo & Menu settings independently for each element.
Q: What happens if I leave a field empty? A: Empty fields fall back to the theme default. For example, leaving Logo Link URL empty keeps the default homepage link, and leaving Logo Width empty uses the theme’s default logo size.
Q: How does the Mobile Menu work? A: When a Mobile Menu is set, mobile visitors (detected via wp_is_mobile()) will see the selected mobile menu instead of the primary menu. Desktop visitors continue to see the primary menu. If no mobile menu is set, all visitors see the primary menu.
Q: Will this plugin affect my site’s performance? A: No. The plugin uses WordPress object caching for element matching and only loads its admin CSS/JS on the Header Element edit screen. Frontend output is limited to a small inline <style> tag and standard WordPress menu filters.
Q: I set a Logo Width but it doesn’t seem to take effect. Why? A: The plugin uses !important in its CSS to override theme styles. If it still doesn’t work, check that your Header Element is published and its Display Rules match the current page. Also ensure GP Premium’s Header Elements module is enabled.
Q: Can I use this plugin alongside other GeneratePress add-ons? A: Yes. The plugin only hooks into specific GeneratePress filters (generate_logo_href, generate_logo_output, wp_nav_menu_args) and does not conflict with other GP Premium modules.
Q: What happens when I deactivate or uninstall the plugin? A: Deactivating the plugin simply stops all overrides — your site reverts to theme defaults. Uninstalling removes all plugin meta data from Header Elements and cleans up stored options.
How It Works
Create a Header Element
Go to Appearance → GeneratePress Elements → Add New and choose Header Element as the element type.
Set Display Rules
Use built-in Display Rules to choose where this header appears — Entire Site, Front Page, Blog, Post Types, Categories, etc.
Configure in Header Rules
Scroll down to the Header Rules metabox and configure your logo, menus, widths, and styles across the 5 tabs.
Requirements & Compatibility
- WordPress 6.3+ | PHP 7.4+
- GeneratePress (free theme)
- GP Premium (required — Header Elements is a GP Premium feature)
- WooCommerce, WPML & Polylang compatible
- Works with all caching plugins (WP Rocket, W3 Total Cache, etc.)
- Tested up to WordPress 7.0
GP Premium Display Rules
- Display an Element to a Parent Page and All Child Pages
-
Display an Element to all Single Posts that are in the Subcategories of a Parent category